Introduction
What is PyPot?
PyPot is a framework developed in the Inria FLOWERS team to make it easy and fast to control custom robots based on dynamixel motors. This framework provides different level of abstraction corresponding to different types of use. More precisely, you can use PyPot to:
- directly control robotis motors through a USB2serial device,
- define the structure of your particular robot and control it through high-level commands.
PyPot has been entirely written in Python to allow for fast development, easy deployment and quick scripting by non-necessary expert developers. The serial communication is handled through the standard library and thus allows for rather high performance (10ms sensorimotor loop). It is crossed-platform and has been tested on Linux, Windows and Mac OS. It is distributed under the GPL V3 open source license.
The next sections describe how to install PyPot on your system and then the first steps to control an Ergo-Robot. If you decide to use PyPot and want more details on what you can do with this framework, you can refer to the tutorial.
Installation
Via Python Packages
The PyPot package is entirely written in Python. So, the install process should be rather straightforward. You can directly install it via easy_install or pip:
pip install pypot
or:
easy_install pypot
The up to date archive can also be directly downloaded here.
From the source code
You can also install it from the source. You can clone/fork our repo directly on github.
Before you start building PyPot, you need to make sure that the following packages are already installed on your computer:
Other optional packages may be installed depending on your needs:
Once it is done, you can build and install PyPot with the classical:
cd PyPot
python setup.py build
python setup.py install
Testing your install
You can test if the installation went well with:
python -m "import pypot"
You will also have to install the driver for the USB2serial port. There are two devices that have been tested with PyPot that could be used:
- USB2AX - this device is designed to manage TTL communication only
- USB2Dynamixel - this device can manage both TTL and RS485 communication.
On Windows and Mac, it will be necessary to download and install a FTDI (VCP) driver to run the USB2Dynamixel, you can find it here. Linux distributions should already come with an appropriate driver. The USB2AX device should not require a driver installation under MAC or Linux, it should already exist. For Windows XP, it should automatically install the correct driver.
Note
On the side of the USB2Dynamixel there is a switch. This is used to select the bus you wish to communicate on. This means that you cannot control two different bus protocols at the same time.
At this point you should have a PyPot ready to be used! In the extremely unlikely case where anything went wrong during the installation, please refer to the Known Issues.
QuickStart: playing with an Ergo-Robot
To let you discover what you can do with PyPot, in this section we describe the few steps required to make a robot build from robotis motor dance. This short introduction will in particular describe you:
- how to define your robot within the software,
- how to connect it to your computer,
- and finally how to control it.
We have developed in our team the Ergo-Robot as a way to explore large scale long term robotic experiments outside of the lab and we have made the whole hardware and software architecture available publicly in an open-source manner so that other research team in the world can use it and leverage our efforts for their own research. As a consequence, you can easily build your own Ergo-Robot.
In this Quick Start, we will use this robot as a base and thus assume that you are using such a robot. Obviously, you can transpose all the following examples to any particular robot made from robotis motor.
Building your own Ergo-Robot
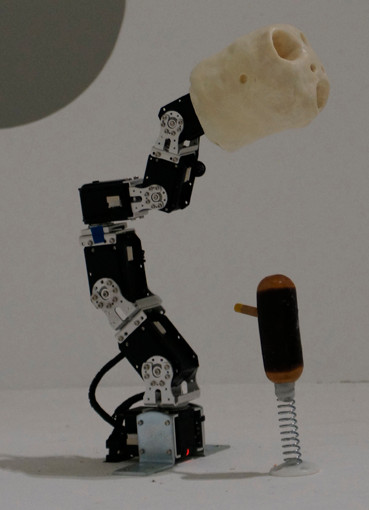
Ergo-Robots have been developed for an art exhibition in Fondation Cartier: Mathematics a beautiful elsewhere. They are small creatures made from robotis motors and shaped as a stem with a head designed by David Lynch. They were developed to explore research topics such as artificial curiosity and language games. The robots were used during 5 months at the exhibition. More details on the whole project can be found here.
The complete instructions to build your own Ergo-Robot are available here.
Connecting the robot to your computer
Now that you have your own robot, let’s start writing the code necessary to control it.
The first step is to setup the configuration for your robot. It will describe the motor configuration of your robot, the USB2serial controller used and make the initialization really easy. Configurations are described as Python dictionaries. Yet, they can be quite repetitive to write. Luckily, the PyPot package comes with an example of a configuration for an Ergo-Robot. You can first import it, so you can modify it:
from pypot.robot.config import ergo_robot_config
If you do some introspection on this object, you will see that it is just a regular Python dictionary. So you can directly edit it like you will do with any other dict. You can also copy the one provided with PyPot and work with your own copy:
my_config = dict(ergo_robot_config)
my_config['controllers']['port'] = 'COM6' # For Windows' users
You will only have to modify the USB2serial port and the id of the motors so they correspond to your robot. If you do not know how to get this information, you can refer to the documentation on the Herborist tool. Alternatively, you can directly ask PyPot:
import pypot.dynamixel

print pypot.dynamixel.get_available_ports()
['/dev/tty.usbserial-A4008aCD', '/dev/tty.usbmodemfd1311']

dxl_io = pypot.dynamixel.DxlIO('/dev/tty.usbserial-A4008aCD')
print dxl_io.scan()
[11, 12, 13, 14, 15, 16]
Note
You can save/load configurations from any format that can be written/read as a Python dictionary. A wrapper for loading json configuration file is provided (see from_json()).
Once you have edited the configuration dictionary, you should be able to instantiate your robot directly like this:
import pypot.robot

ergo_robot = pypot.robot.from_config(my_config)
At this point, if you have not seen any errors it means that you are successfully connected to your robot! You can find details on how to write more complex configuration file in the Writing the configuration section.
Controlling your Ergo-Robot
Now that you are connected to your Ergo-Robot, let’s write a very simple program to make it dance a bit.
First, write the following lines to start you robot (we assume that you have correctly setup your configuration):
import pypot.robot

ergo_robot = pypot.robot.from_config(my_config)
ergo_robot.start_sync()
Except from the last line, everything should be clear now. This new line starts the synchronization between the “software” robot and the real one, i.e. all commands that you will send in python code will automatically be sent to the physical Ergo-Robot (for details on the underlying mechanisms, see Sync Loop).
Now, we are going to put the robot in its initial position:
for m in ergo_robot.motors:
    m.compliant = False

    # Go to the position 0 within 2 seconds.
    # Note that the position is expressed in degrees.
    m.goto_position(0, 2)
The robot should raise and smoothly go to its base position. Now, we are going to move it to a more stable position. We will use it as a rest position for our dance:
rest_pos = {'base_tilt_lower': 45,
            'base_tilt_upper': -45,
            'head_tilt_lower': 30,
            'head_tilt_upper': -30}

# You can directly set new positions to motors by providing
# the Robot goto_position method with a dictionary such as
# {motor_name: position, motor_name: position...}
ergo_robot.goto_position(rest_pos, duration=1, wait=True)
We will now create a very simple dance just by applying two sinus with opposite phases on the base and head motors of the robot:
import numpy
import time

amp = 30
freq = 0.5

# As you can notice, property to access the motors defined
# in the configuration file are automatically created.
ergo_robot.base_pan.moving_speed = 0 # 0 corresponds to the max speed
ergo_robot.head_pan.moving_speed = 0

t0 = time.time()
while True:
    t = time.time() - t0
    if t > 10:
        break

    x = amp * numpy.sin(2 * numpy.pi * freq * t)
    ergo_robot.base_pan.goal_position = x
    ergo_robot.head_pan.goal_position = -x

    time.sleep(0.02)
Your robot should start dancing for ten seconds. Now, that you have seen the very basic things that you can do with PyPot. It is time to jump on the tutorial to get a complete overview of the possibility.